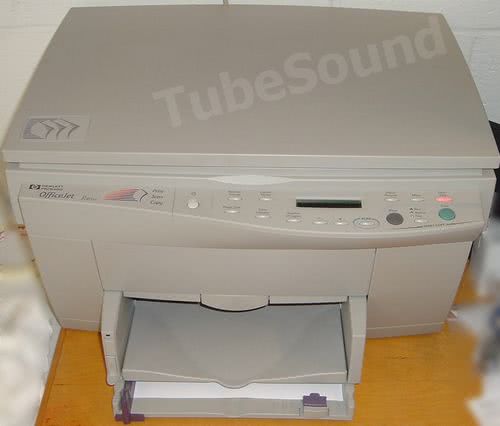
As a fan of vintage tube equipment, it should come as no surprise that I prefer older quality computer equipment. In this article, I explain how to repair “Scanner System Failure” problems in a vintage HP Officejet R-series multifunction scanner-printer. Model R40xi is shown in the photos, but all models (R40, R40xi, R60, R60xi, R80, R80xi) repair the same. In fact, many similar HP multifunction units of this era are repaired in similar manner.
First, let me explain why I feel that these vintage HP units are worth repairing. Why fix an “old parallel-port printer” when new models are so cheap? Like most things in life, you really do get what you pay for, and if HP paid me to take their new models (with the assumption that I actually had to use them), I would not be interested.
During the Lew Platt years, HP was making top quality products. This period of quality was from the early 1990s (Laserjet 4-series and beyond) through the Officejet R-series of 1999. The hardware during this time was built-like-a-tank, and when compared to today, the ink supplies were reasonable (although they certainly seemed expensive at the time).
Let us look at the economics: Officejet R-series uses a #45 cartridge, holds 42-mL ink, retail cost $30. This HP45 can be purchased for $5 on eBay. Modern HP cartridges hold as little as 5-mL ink and cost $15 — which is 4.2 times more expensive using retail price comparisons. If you consider surplus #45 cartridge prices as your comparison, the cost to operate a new HP printer can be 42-times more expensive. And if you are an environmentalist (or anyone who hates frivolous waste), ask yourself whether it is environmentally responsible for HP to manufacture an ink cartridge that only holds 5-mL or 10-mL? Certainly not, and those puny cartridges are only sold to pretend that the new cartridge price is cheap, when in fact it holds 4-to-8 times less ink. That is an insult to your intelligence and an affront to the environment.
In another example, a modern HP toner cartridge (for a current model) costs $99 retail with approx 2,000 page yield. Surplus HP toner cartridges for the old 4-series, 5-series, or 6-series can be purchased for approx $20-$30 on eBay, and have 3,000+ page yields. Vintage Laserjets have been known to be run strong with 500,000 page cycles. Any chance you will get even 50,000 page cycles with a modern unit? Good luck with that. And how many Nag messages from the new drivers to “buy more ink” would you click on during that time? Well — no nag messages with old HP units!
So when you analyze the situation, the answer is obvious why I fix these old HP units. (1) High build quality of the hardware, (2) low cost of use (ie – cheap ink), (3) OS drivers that respect you as a person, without bloat or nag screens to harass extra ink purchases, (4) ink that does not “expire” because some Corporate Executive wanted to sell more ink to pay for his/her 7-or-8 figure CEO salary + stock options + benefits + perks + Golden Parachute retirement package.
Let us compare the “new” models. By ‘new’ models, I consider any model released in the Carly Fiorina era and beyond to be ‘new’. The only benefits that I can see in the new models are USB connection (which is easier for most users but otherwise adds no functionality) and much better color printing. Since I have no problem with parallel ports and only print black-and-white, those issues are not important to me. Otherwise, it is my opinion that the quality of the new hardware is much lower than the older models, the cost of consumables (ink/toner) is outrageously expensive, the computer drivers are bloated and filled with nag messages that harass you to “buy more ink”, and some models “expire” the ink cartridges based upon a random date. If you feel respected as a customer with that experience, more power to you. Personally, I am not interested in participating.
With that explanation, let us move on to the repair. As always, repairs are only suited for experienced electronic technicians with suitable training. Also, it is useful to take a video of your repair project so that you can reexamine your work if you get stuck during reassembly.
REPAIR
The most common “defect” that a user will see is the “Scanner System Failure” message on the front panel. This problem is really NOT a HP design defect or quality issue. Four factors play a role in this error message, but one factor is most important. Very simple — All fluorescent bulbs go dim with age, and your scanner bulb is failing. As the message becomes more frequent, your bulb condition is getting worse. Therefore, your HP unit is correctly reporting that the scanner is malfunctioning. Nothing that HP could have done would have avoided this issue. Light Bulbs go bad — it happens. Time for a new bulb.
The bulb can be purchased for approx $13 online, Manufacturer Part #: BF26250-24B, Description: CCFL Cold Cathode Fluorescent Backlighting Lamp 2.6mm X 250mm White.
The four factors that contribute to the “Scanner System Failure” message are:
- defective scanner bulb,
- dirty scanner eye,
- cold room temperature,
- dirty scanner mirrors.
Nothing else is an issue unless you have an obscure electronics defect, which I have NEVER encountered in my years of repairing these HP units (and similar models) for small businesses. Online forums have many misguided suggestions, but these 4 factors are the only ones with any relevance, and the mirrors have the least importance. Regarding the cold room temperature, HP stated that these Officejets were meant to operate in room temps above 65 degrees. To operate them in colder temps, you definitely will need to replace the bulb more often (colder temps = less bright bulb, so any deterioration of the bulb will cause insufficient bulb lighting in cold temps), or install a small 7 to 10 watt “nightlight” miniature bulb inside the scanner compartment to keep the scanner compartment warm (the heat generated from the 10-watt bulb will warm the scanner compartment). Yes, that does work and does not affect the scanning (assuming that you mount it away from the moving scanner assembly). I have operated one of my R40 units during the past 5 winters in room temperatures regularly as low as 40-degrees without any problems.
While performing the repair, you will want to:
- blow out any dust inside the scanner compartment,
- inspect the scanner belt for wear,
- thoroughly clean both sides of the scanner glass,
- (*) clean the scanner eye with cotton swab and glass cleaner (VERY important — the scanner eye has been EXTREMELY dirty on EVERY unit that I worked on, and your cotton swab will look dirty brown when you are done cleaning),
- (*) replace the scanner bulb,
- clean the scanner mirrors with glass cleaner. The mirrors are located inside the black cover that surrounds the scanner assembly, on the underside. The scanner assembly can be flipped upwards once the belt tension has been released.
[ (*) These steps are critical. ]
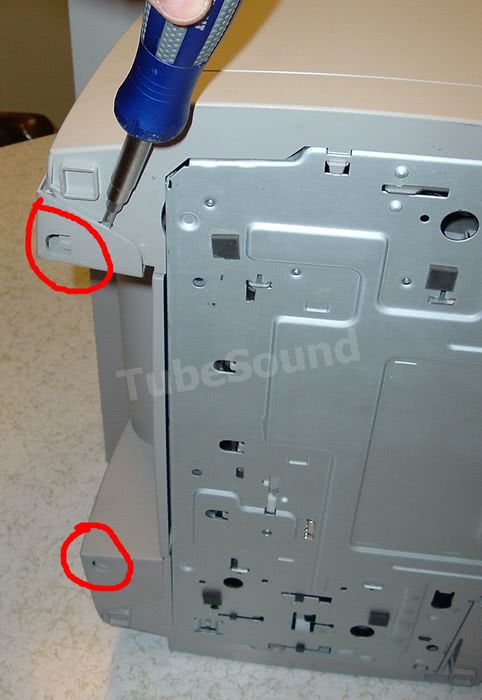
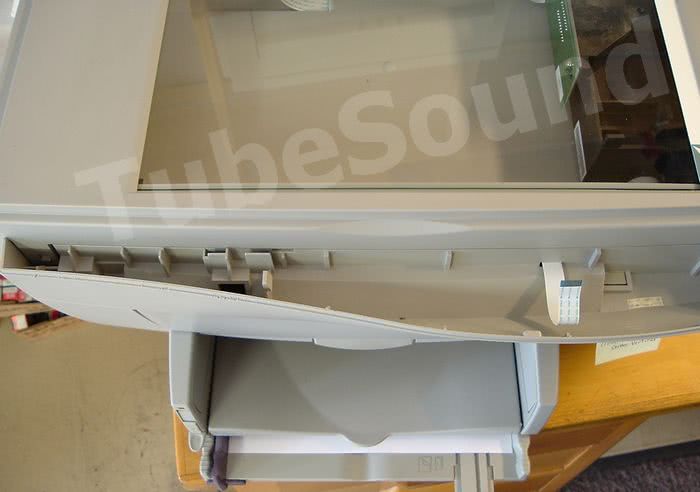
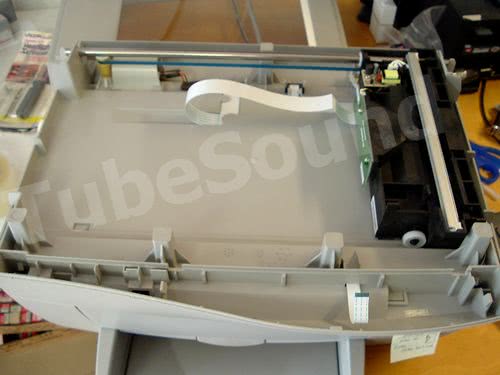
Summary of disassembly: To get into the scanner compartment, remove the scanner lid or fax lid. Remove the two Torx screws along back top side (one in each back corner). The front bezel easily prys off with a screwdriver. Remove and unplug the LCD display. Remove the bezel to the left side of the LCD. Open the lower section of the unit as if you were installing a new print cartridge. See two tabs on the left and right front sides of the raised scanner unit, which allow release of the front side of the scanner cover. With the rear Torx screws already removed, a few tabs also hold the back sides of the scanner compartment cover in place, and can be released by gently prying the rear sides with screwdriver or butterknife. The scanner cover should now lift upward.
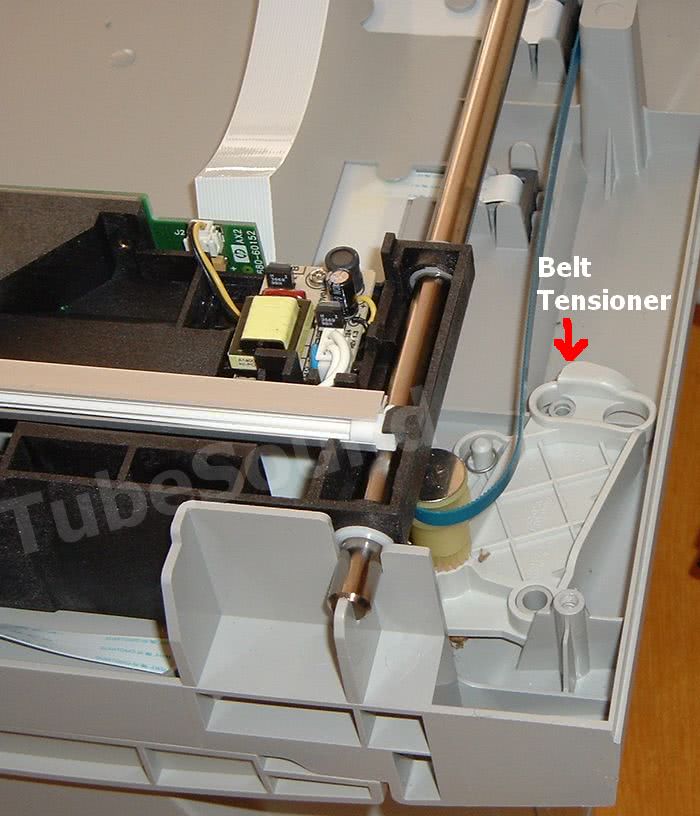
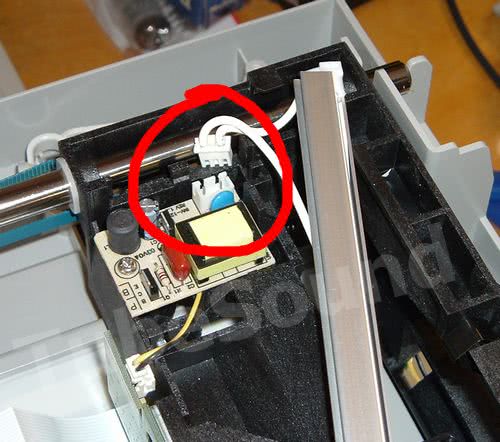
Find the belt tensioner and release the belt tension. Remove the black cover from the scanner assembly. Unplug the scanner bulb (white harness), and gently lift out the scanner bulb assembly. Set it aside, and thoroughly clean the scanner eye. Clean the scanner mirrors (must flip-up the scanner assembly; scanner mirrors are on the bottom side).
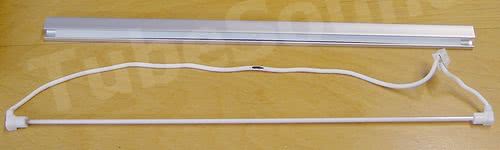
The scanner bulb is held inside the metal bracket with the rubber ends. Gently remove the bulb, then pry back the rubber ends. Cut out the old bulb, solder in the new bulb. You must work VERY CAREFULLY with the new bulb, as they are very thin and fragile. It is easy to break the new bulb. Slide the rubber covers back onto the bulb, and gently push bulb back into metal bracket. Reassemble everything, fire up the unit and immediately notice how much brighter the new bulb is, …and enjoy! After doing this job once, if you ever repair another unit you will find that it can be done in approx 45 minutes. As a first time project, expect 2 to 3 hours. Out-of-pocket cost for this repair is approx $20.

Lifting the Scanner Assembly in order to work on the Printer section
One of my readers, Vickie, asked me how to lift the scanner assembly in order to work on the printer section. This is surprisingly simple, and does not require ANY of the steps that we did above for the bulb replacement. You can start this trick from scratch.
- Remove the lid (whether it is the fax lid [R80], sheetfeeder lid [R60], or dummy lid [R40]) and set it aside.
- Turn machine on its side, look at the lower back door & see a tab on each bottom side. Gently pry to release lower back door. The door will swing upward once both tabs are released. Set door aside. Turn machine upright again.
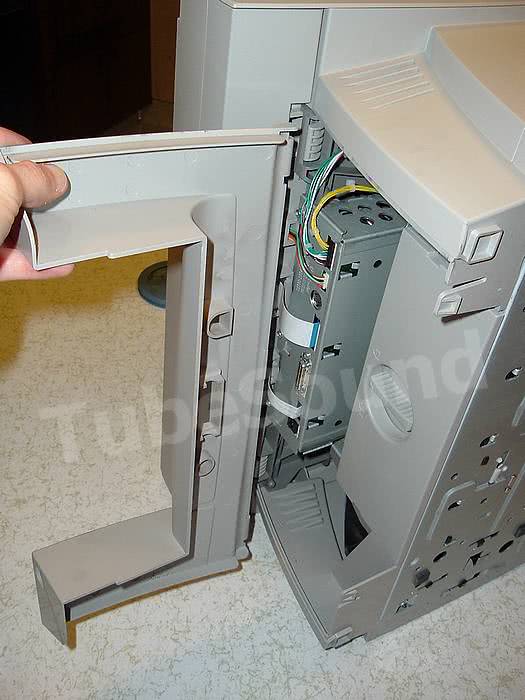
- Open front door, release springs from front door (one spring on each side).
- Your choice how to proceed with step #4 (either method will release the front door assembly and allow you to completely swing the entire scanner assembly upward to a 90-degree upright position) — a) the correct way is to grab the “finger” releases (one on each side) and push backward and slightly downward simultaneously. This releases the entire front door assembly and keeps it intact. b) alternatively, and this works fine also (and possibly easier, especially if you have never done it before), just gently spread the door hinges.
- The scanner assembly is now released, and you can stand it upright to work on the printer section. If desired, with a little more effort the scanner assembly can be unplugged (ribbon cable at rear back door) and completely set aside.