
This article discusses repair and calibration of the older tube-based Sencore Mighty Mite tube testers that use the 12AU7A tube inside, models TC130, TC136, and TC142. High voltages are present, repairs should only be attempted by a qualified technician. Copyrighted, all rights reserved.
Introduction
Sencore Mighty Mite testers employ a Cathode Emission test circuit, with short detection and industry-best 100-Megohm leakage detection. The leakage detection circuitry is really the reason that every technician should own a Mighty Mite as part of his/her tube testing arsenal.
All Mighty Mites are designed to test newer tubes. You will not find any antique sockets (such as 4-pin, 5-pin, 6-pin, 8-pin large, etc.) Socket configuration consists of Octal, 7-pin miniature, 9-pin miniature, Nuvistor, novar, Loctal, and Compactron.
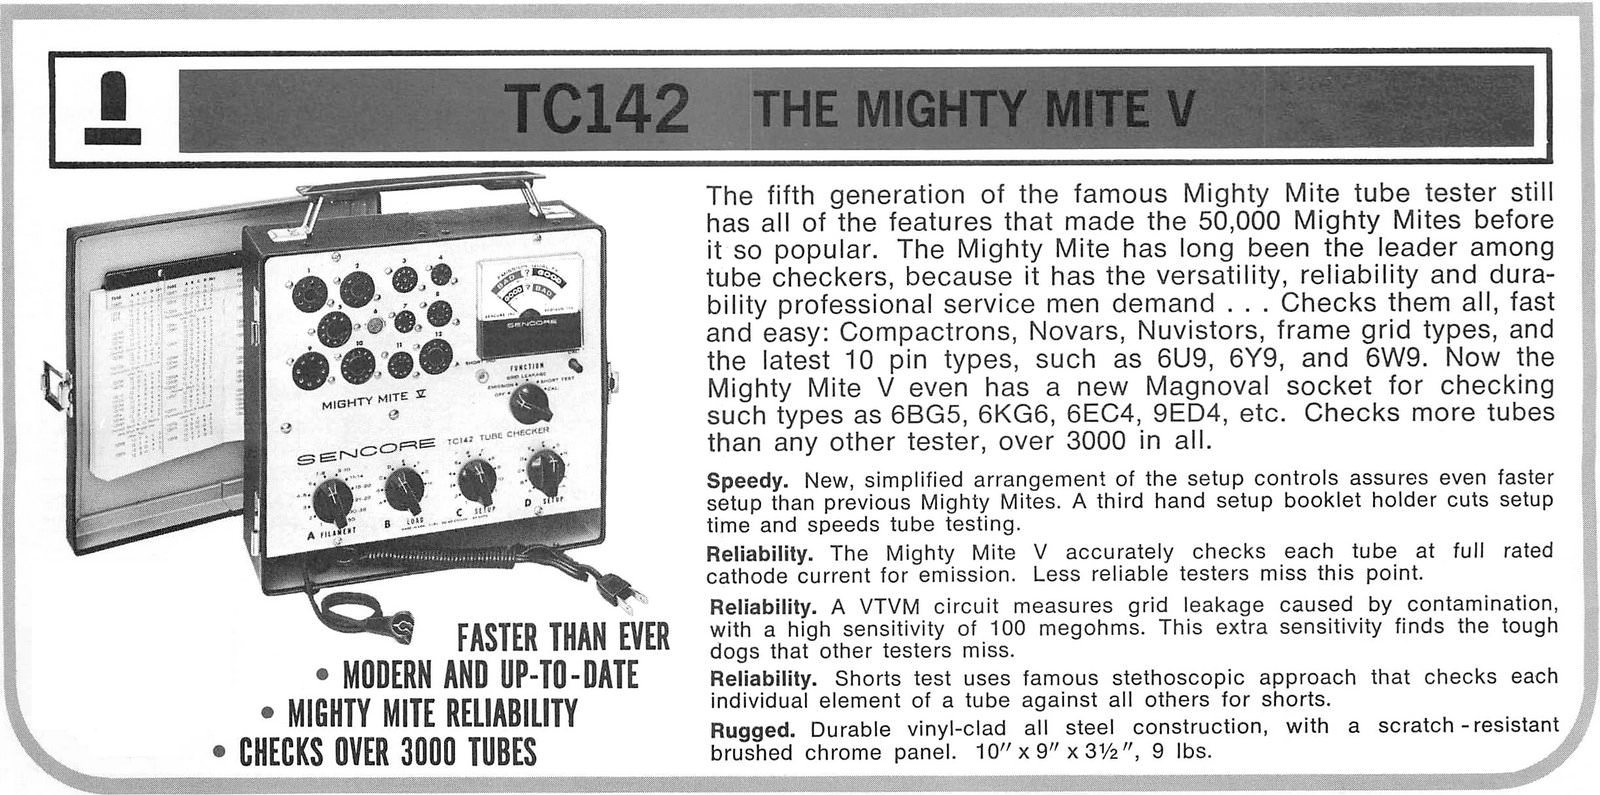
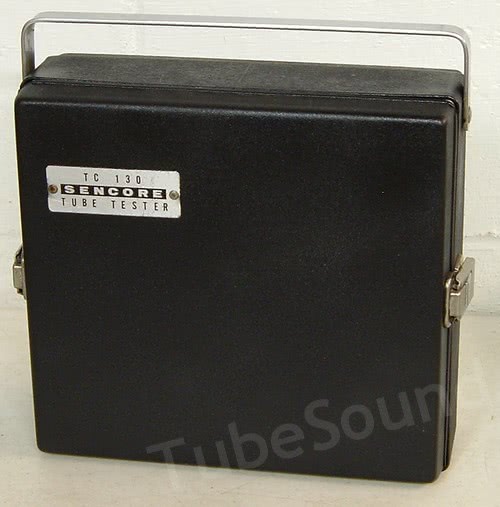
Each model has a roman numeral designation: TC130 = Mighty Mite III. TC136 = Mighty Mite IV. TC142 = Mighty Mite V. There are no practical differences among them.

The older Sencore Mighty Mite tube testers have tube circuitry inside, whereas newer Mighty Mites (such as TC154 and TC162) are transistorized. Otherwise, their functionality is comparable. Some units have a CRT picture tube wire harness with socket attached. This harness is very bulky, so common sense would suggest removing it. It serves no practical purpose and only clutters up the case. Some models have a few pin straighteners on the front panel.
The tube circuitry and transistorized versions each have advantages and disadvantages. I feel that the tube circuitry is easier to repair because you have more room to work — no miniature circuit boards! The internal 12AU7A tube is commonly available, and most owners will already have a replacement when needed. The transistor in the newer Mighty Mites will be a special-order for most people, and replacements are harder to find. Of course, a transistorized Mighty Mite may need recalibrated less often — although, as you will see, calibration of the tube units is very quick & easy once the unit has been properly repaired/restored.
Cleaning
You must be VERY careful when cleaning the electronics of a Mighty Mite, or you will have a non-functioning Mighty Mite. The heart and soul of the Mighty Mite is its ultra-sensitive Leakage circuitry. Leakage detection sensitivity is over 100-megohms. This is the one function that is not comparable in other tube testers, and is truly a highly valued feature.
Do NOT clean the guts of your Mighty Mite with any of these modern biodegradable cleaner/degreaser agents, such as Clean-Rite Purple Power®, Castrol Super Clean®, or anything similar. Regardless of how much you rinse the cleaning solution off, and regardless of whether months or years pass, these cleaners seem to create leakage problems that do not go away easily. Switch your Mighty Mite into Grid Leakage test after using these cleaners, and you will find your tube tester detecting Leakage even with no tube in any socket.
If this problem has happened to you, you may have a VERY tough time fixing the problem. I have had units sent to me with this problem for repair — the problem is rather obvious when you see a perfectly clean Mighty Mite detecting Leakage as soon as you turn it on. The only solution that I have found is to use a powerful Electrical Contact Cleaner/Degreaser and flood each socket (front and back) and each switch repeatedly until the problem is solved, lightly using a nylon brush to agitate the cleaner before it evaporates. Unfortunately, you must be VERY CAREFUL with this type of powerful Contact Cleaner, because it WILL eat into plastic. For example, it can ruin the meter faceplace, it can dissolve the pin straighteners found on some Mighty Mites, and it will even eat into the internal plastic layers found inside the “C” switch (there are clear-plastic spacers/shields between each switch layer inside switch “C”.)
Therefore, I would suggest not using any cleaning solution on your Mighty Mite unless you need to remove stubborn grease or grime. You can blow the dust out of your tester with a garage Air Compressor. If grime must be removed, use a very mild soap, diluted, and rinse well and let dry for a very long time.
A properly working grid leakage circuit should not register almost any leakage (in any position A through K on Switch ‘D’) when no tube is being tested. (Note that Position H-K on Switch D will register a little higher, and this is normal.)
Preparation for Service/Calibration
Start with having a copy of the service manual.

TC130 service manual with tube setup chart, $13.99 free ship USA

TC136 service manual with tube setup chart, $13.99 free ship USA
Remove the guts from the case. Inspect each wire leading to each tube socket terminal. Look for broken wires at each socket terminal, and inspect for any wires that may be shorting to other wires/terminals or shorting to the chassis. Inspect the AC line cord and top cap wire, and replace if necessary. Check that the meter needle is indexing at the far-left line on the meter with power off, and adjust face setscrew accordingly.
Check every resistor, and replace any that are out of tolerance. Most of the resistors are silver-band 10% tolerance, and a few (such as the 10-Meg resistor) are 5% tolerance. Replace as necessary. Pay special attention to the 10-meg resistors and also the load resistors under Switch “B’. Since most of the load resistors are silver-banded 10% tolerance, a natural variation in Emission test scores is normal and acceptable.
Always replace the 0.1 cap that is integral to the Shorts circuit. It is commonly defective. Likewise, replace the 20mf electrolytic cap. The remaining three caps are disc-style 0.01mf, and seldom defective. Replace only if defective.
Check the internal 12AU7A tube with another tester, replace if weak, shorted, or leaky.
Make sure each rotary switch position has good continuity, and carefully clean as necessary.
Power on unit, and check each Filament voltage position for proper voltages. If any position does not register, you either a problem with the “A” Filament switch, or an open transformer winding.
Pair of new socket savers: 1 each SS-8 (octal) and SS-9 (9-pin-miniature). $29.99 free ship USA.
Note: The case lid may not close on many Mighty Mites with socket savers installed, especially when installing the octal socket saver. Buy at your own discretion.
Calibration
Calibration can only be attempted if all of the preparation has been thoroughly completed. Anything less is a total waste of your time. Calibration assumes that all circuit components are working properly, which means accurate resistor values, good continuity, and working capacitors.
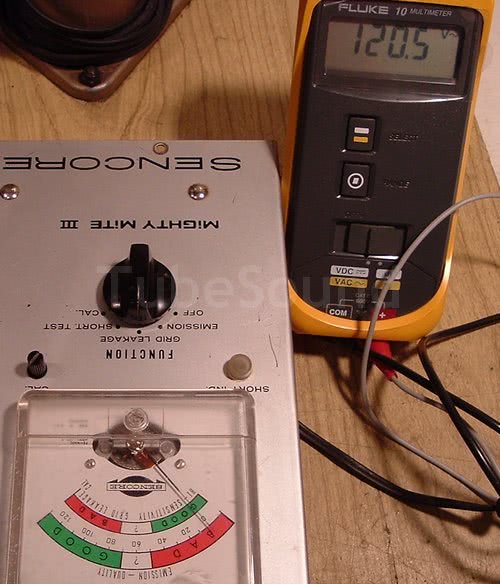
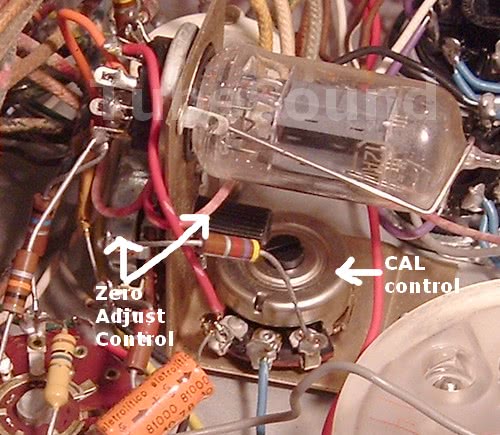
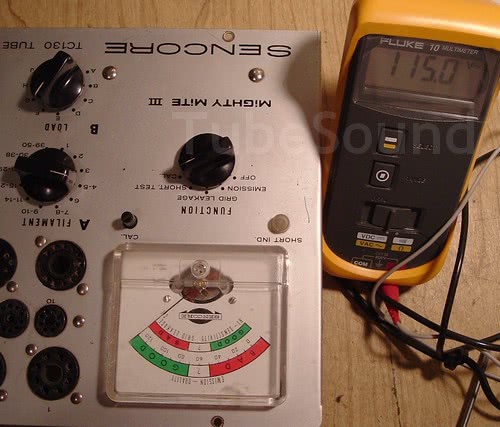
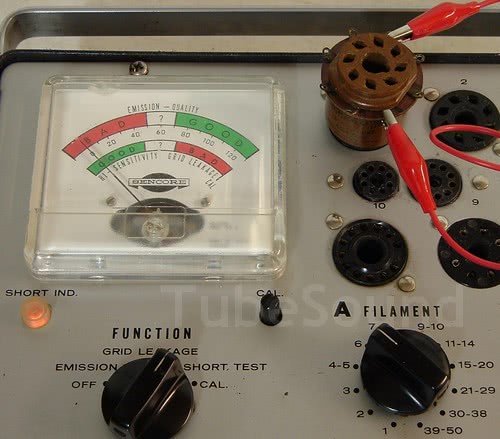
Calibration of these tube-type Mighty Mites is straightforward. You need a variac and a voltmeter, preferrably a vintage USA digital Fluke for maximum accuracy. You will be adjusting the CAL and Zero Adjust Potentiometers, which are shown in this photo.
Plug the tester into the variac, Power-on the tester into CAL position, and set the Variac for 115 volts. Allow tube tester adequate time to warm up, preferably at least five minutes. Monitor the line voltage with your Fluke.
Adjust the CAL control on the front panel until meter reads CAL on the right side of the meter.
Switch the function switch to Shorts-position, and adjust the internal “Zero Adjust Control” until meter reads Zero. (Note that Zero is not all the way on the left).


The CAL control and ZERO ADJUST CONTROL will interact with each other, so repeat the adjustments several times until both controls are calibrated as you switch back and forth.
You can now disconnect from the Variac. When using the tester at full line voltage, be sure that you READ THE INSTRUCTIONS and are using your tester properly. After inserting a tube for testing, you MUST switch to the CAL position first and adjust the CAL control. This properly adjusts the circuit for your line voltage, taking into account any load draw from the tube under test. You readjust this front panel CAL setting with each tube that you test.
Test Shorts and Leakage
Turn the function switch to SHORTS position, and rotate switch D to all positions, making sure that the shorts light does not illuminate. Insert a test socket, jumper two pins together, and make sure that these self-induced shorts are properly being detected.
Next, turn the function switch to GRID LEAKAGE position, and rotate switch D to all positions, making sure that the meter does not detect Grid Leakage with no tube under test. If it does, re-read the section above regarding cleaning. Insert a test socket, connect a high megohm resistor (such as 10-Meg) between two pins, and make sure that this self-induced Leakage is being detected in the appropriate switch position.

How Long will calibration last?
Impossible to answer. You must recalibrate when replacing the 12AU7A tube, as this will totally uncalibrate the unit. As the 12AU7A tube ages, calibration will also need to be checked. Since the calibration procedure is quick and easy (all of the hard work is in the rebuilding/repair/cleaning), there is no reason why any serious owner cannot check the calibration on a regular basis.
Why do I need a Mighty Mite? What is the primary benefit of a Mighty Mite?
As discussed earlier, the Grid Leakage circuitry is the bread-and-butter of a Mighty Mite. This enables testing for leakage and gas between the control grid and all other tube elements. The Sencore manual does a good job of explaining this benefit. “A lower sensitivity of 2 to 5 megohms found in many tube testers may eventually reject the tube but not during the time that it is being tested because tube heat causes the leakage to increase with time.” In other words, unless the tube was very hot and operating in-circuit, and then immediately inserted into a tube tester, it is unlikely that other testers would find the leakage. Since most tubes are tested “cold” (meaning not removed hot from circuit), you can readily see the advantage of the Mighty Mite leakage test. Continuing from the manual: “On some tubes, leakage may not reach this low level and the checkers with lower sensitivity will not find the ‘tough dog’ tube.”
Practical examples? I was talking with a friend of mine who is a true pro technician, and we came up with two easy examples. First, the old color TV’s used 6GH8A tubes. A gassy condition in the 6GH8A tubes would cause problems after the tube was hot, often not problematic until 30 minutes or more of tv operation. The Mighty Mite was the only tester that would quickly and reliably detect this gassy condition within a few minutes of testing a cold 6GH8A.
As a second example, my friend will ONLY test certain high-end audiophile tubes with a Mighty Mite. Tubes such as 6550 and EL34, among others. He finds very little merit in knowing the mutual conductance of the tube. The best indicator of whether those tubes will function properly in-circuit is whether they have good Emission and whether they are gassy. And again, with most testers you have to wait until the tube has been operating for 30+ minutes before the leakage might be detected. The Mighty Mite will find this leakage from a ‘cold’ tube within several minutes. If those tubes pass the Leakage test and test good for Emission, they “just work.” It is that simple. He does repair work on the road, including vintage church organs, Leslies, and other wealthy in-home audio repairs, so he cannot wait for half-hour or longer until a tube may be found gassy with a different tester. This is blasphemy for people who worship the micromhos score of their prized Tung-Sol 6550’s or Mullard EL34’s and view the micromhos score (and a traditional shorts test) as the ‘gold standard’ regarding condition, but the topic is sometimes more complex than that.
Personally, I do find some value in knowing the mutual conductance…for resale value if nothing else…but in reality, the Mighty Mite is more likely to weed out the ‘tough-dog’ tube that will fail in-circuit. This is a fact and explains WHY a Mighty Mite is an important tube testing tool, and sometimes the best tool for the job.
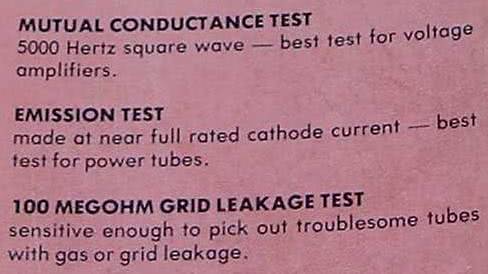
As a side note regarding testing methods, Sencore technicians were of the opinion that Emission was the best test for Power Tubes, and Mutual Conductance was the best test for Voltage Amplifiers. Proof of their opinion (see photo) is found in the documentation for Sencore’s Continental line of tube tester, which incorporates both testing methods in one unit.
This is Food for Thought for people who worship micromhos scores. In practice, both testing methods are excellent indicators of whether a tube has the characteristics necessary to function in-circuit. But a Mighty Mite (or Sencore Continental) will consistently detect those stubborn gassy/leaky tubes before they drive you crazy in-circuit!
Conclusion
The Mighty Mite adds unique capabilities to your tube testing efforts. They are well-built and reliable. They test a large number of tubes; the typical tube setup book has more than 100 pages of data with more than 3,000 tubes listed. You will find test data for many unique and rare tubes in a Mighty Mite setup book that you may not find elsewhere. For these reasons, every technician and tube collector should have a Mighty Mite.
regards,
Bob Putnak.
eBay ID = rjputnak