
by Bob Putnak, ©2010.
Of all the subjects that I have discussed, I receive the most inquiries about my HP Officejet “scanner system failure” repair article. That article also fondly mentions the old-school Laserjet’s, and I had several inquiries about repairing them. These old dinosaurs are still useful to any small business that prints traditional business text documents or for printing schoolwork. So here is an article about how I have repaired and refurbished these Laserjet 4L and 4P printers in the past (not so much anymore!) Do not attempt if you are not qualified to perform such repairs or do not want to risk further damage or inability to reassemble your printer. The basic concept is similar with other models not shown here, although disassembly will be somewhat different.

These printers were built like a tank and page-feed problems are the most common complaint. A general overhaul will take care of most of these issues. In summary: the printer is torn down, thoroughly cleaned with compressed air (including the 4 optical sensors on the mainboard), rubber rollers are treated with rubber rejuvenator, the sticky-stuff is cleaned off of the relay coil, the relay coil arm is wrapped once with thin black electrical tape. If you have a dead printer, you will also inspect the power supply fuses, although a blown fuse is usually the symptom of a real power supply defect.
For air cleaning (“blow out”), I use a large garage-style air compressor, but you could use canned air if that’s all you can get.
1. Remove paper tray, remove 2 side doors, flip open rear door, remove power cord, remove parallel cable, remove toner cartridge and place inside black garbage bag. Remove any paper from the paper tray and blow out the paper tray.
2. With top door open, you will see 4 screws that will be the first step to removing the cover. Remove those screws.
3. There are 4 tabs-fingers that hold the 4 corners of the cover to the chassis. Release those tabs and work the cover straight up and off.

4. Remove the 3 screws that hold the fuser assembly and lift out fuser assembly. Before reassembly, treat all rubber rollers (circled in blue in photo) with Varn Super Rubber Rejuvenator.


5. Set printer on its side so that formatter board is on top. 5 screws remove the metal cover overtop the formatter board, and a 6th screw underneath the metal cover is the final screw that will remove the formatter board. The board can then be set aside.

6. Remove the 2 ground screws below the formatter board as shown in photo.
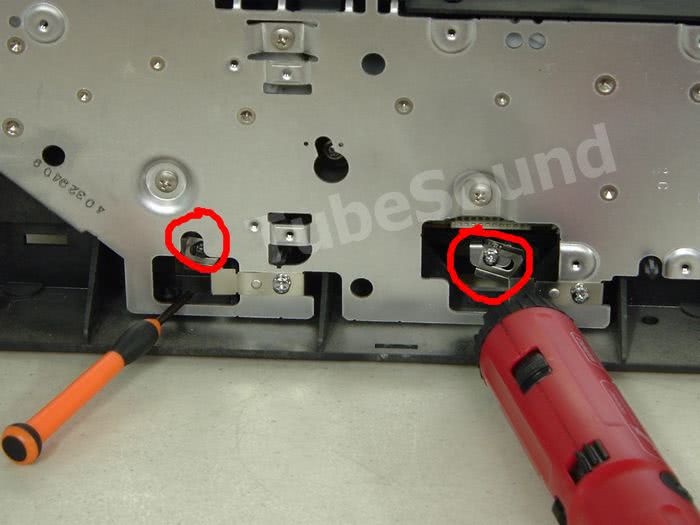
7. Set printer upside down and remove the 8 screws (as shown) that attach the mainboard, then lift out mainboard. Before reassembly, treat both rubber rollers (circled in blue in photo) with Varn Super Rubber Rejuvenator.

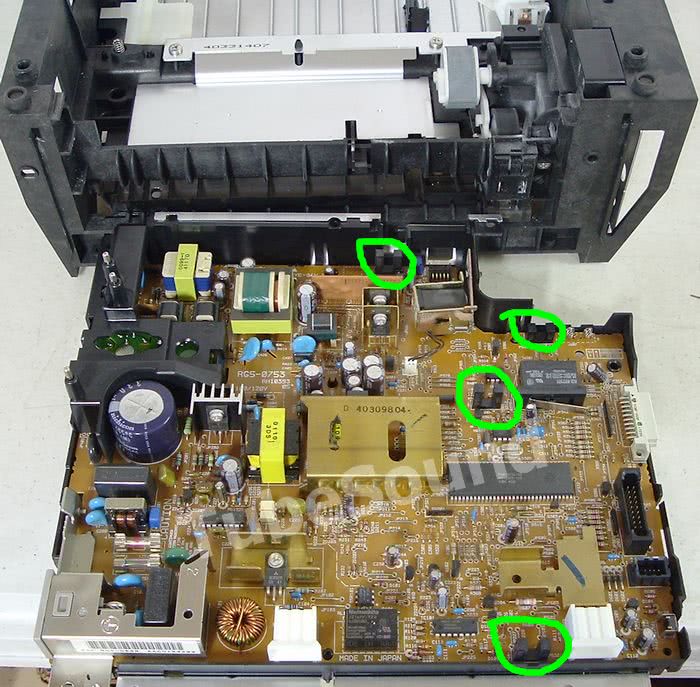
8. Blow out the dust from mainboard, especially around the 4 optical sensors (green circled in my photo)
9. Inspect paper rocker arm for breakage. Paper jams in the front tray-area of the printer are often due to a broken arm. If broken, you must buy a replacement from a printer supply vendor. The arm breaks when you try to remove jammed paper by pulling it “backwards” and out through the front paper tray area. This will break the arm. Paper jams must be removed through the top — remove the toner cartridge and gently pull paper out that direction.

10. Other page feed problems are caused by a sticking relay coil on the mainboard. The relay originally had a felt-type of pad that kept it quiet and kept it from sticking. That pad disintegrates over time and all that remains is the sticky glue that held the pad in place. Clean off any stickiness from the arm, then make a single wrap around the arm with thin black electrical tape.

11. Remove the one screw that holds the relay in place, lift up the relay and clean any stickiness off the coil side, then re-mount the relay. Do not add any tape to this side. Reattach the relay arm.
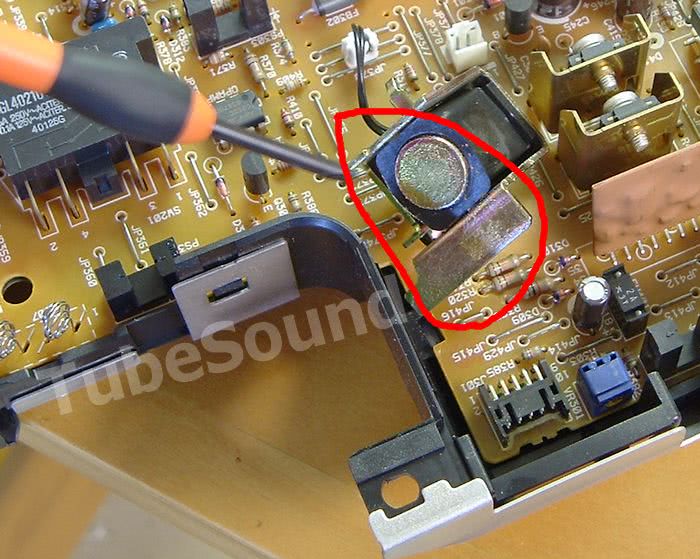
12. There is one more relay in the corner of the machine that requires removal of the drive gear assembly. Clean this relay in the same manner.
To access this relay, you first remove the drive gear assembly (6 screws circled). Next, remove the 2 screws on the top side near the the paper pickup paddle. Grab the white key, pull outward and twist anticlockwise, pull out and set it aside. This releases the assembly. Lift upward, see the relay, clean the relay, black-tape-wrap the arm. Reassemble.


13. Blow out any areas of the printer that you have not already done.
14. Another common source of page feed problems is “hardening” of the rubber rollers. The rollers seldom need replaced, although many printer techs will tell you that the only fix is to install new rollers. I disagree. If that was the only solution, then professional print shops would be changing rollers all the time. I treat all rubber rollers and rubber pickup with a quality rubber rejuvenator. The only product that I will use is Varn Super Rubber Rejuvenator. The product is used by professional print shops to keep their high-volume printing presses and (these days…) computer printers running smoothly. This product has always worked great for me. To my knowledge it is not even sold in small amounts and not targeted towards end-users. My local printshop buys it by the one gallon can and I buy a small jar from them.
15. If you feel adventurous, disassemble and clean the fusing unit. This is a spring-loaded assembly, and the black round object is very fragile.

16. After treating all rubber rollers, reverse the steps and reassemble . You may find that the first few pages have page feed problem, but should clear up after a couple of pages.
17. Check pinch rollers and replace if defective. The rear pinch rollers are probably defective. Typically, the shaft is completely broken, or it is near breaking. Each pinch roller is held into place by a thin metal spring clip. As the roller turns, the metal spring clip tends to act like a wire saw, and it cuts into the shaft of the roller pin, effectively slowly cutting the shaft off from each end. Brand new pinch rollers are still available at a reasonable price, so it is smart to install new ones and maybe buy a few spares for the future.


18. As regular maintenance, you may want to re-treat the rubber rollers with a quick wipe of rubber rejuvenator at regular six-month intervals or as needed.
That procedure solves most 4L and 4P problems, so for those of you still rehabilitating these dinosaurs, hopefully this will be useful information. Of course, this will not fix power supply problems, fuser problems, or formatter board problems, but those are very rare problems with these models.