This article will discuss my method of professionally installing a socket saver into the socket panel of a Hickok 6000 / 6000A / 6005 tube tester, and is designed so that (1) you cannot even see that a socket saver is installed, (2) the case lid will close normally, and (3) the socket saver is easily replaceable when it wears out.
The Hickok 6000-series of tube testers use a plug-in socket panel instead of individual sockets affixed to the chassis. The socket panel protrudes upward, and there is no extra room between the socket panel and the case lid. Therefore, traditional installation of a socket saver (plugging it into an existing socket) is unacceptable for these testers because the case lid will not close.
Fortunately, if you are willing put forth effort, you can have your cake and eat it too! This project will demonstrate a 9-pin miniature socket saver installation, but the process can be adapted for other sockets.
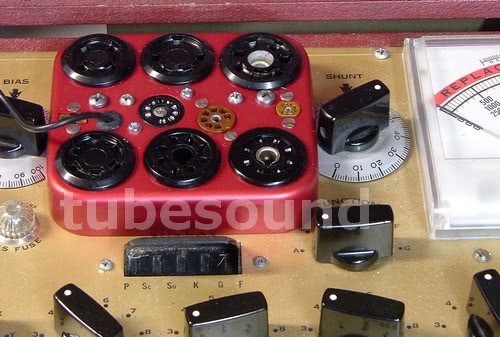
When you are finished, here is what you will accomplish:

Photo above shows Hickok 6000 after my method of professionally installing the socket saver. It is impossible to see that a socket saver is even installed!
Project time will be two to three hours, and does require installing a new 9-pin miniature socket. The original 9-pin miniature socket is probably worn out anyway, so you accomplish two tasks at the same time.
- Remove the two larger phillips-head screws that hold the socket panel in place, then lift the panel to remove it (it is plugged into the tester via a round 11-pin plug). Now you can work on the panel more easily.
- Remove the two long screws that affix the 11-pin round plug to the panel.
- Take notes of which color wires go to each pin on the 9-pin miniature socket, then cut or unsolder the wires from the 9-pin miniature socket. Drill out the rivets holding the 9-pin miniature socket to the panel, and remove and discard the old socket.
- You will need (1) a pair of 1-inch nylon spacers (0.25 inch diameter), available at most hardware stores; (2) a new bottom-mount 9-pin miniature socket; (3) two screws (approx 1.3 inches long) and nuts to mount the new socket, (4) a 9-pin miniature socket saver that will fit flush with the Hickok 6000 panel. The modern 9-pin socket saver works great for this project, and in fact mounts perfectly flush with the Hickok panel, making it a better choice than a vintage socket saver.
- Plug the socket saver into the new 9-pin miniature socket.
- Measure the height that the socket saver protrudes above the socket, and trim the nylon spacers to that height. In my situation, the socket saver was approx 20mm. It is better to cut the nylon spacers a little shorter; do not leave them long.
- Push your 9-pin miniature socket mounting screws through the top of the panel. Now, working from the underside of the panel, slide on the nylon spacers first, THEN slide on your new socket with the socket saver already plugged in. Hence, you are mounting the new 9-pin miniature socket approx one inch BELOW the surface of the panel, and the socket saver itself is now flush-mounted with the surface of the panel. Attach and tighten the nuts.
- Reconnect the wires to the new 9-pin miniature socket. If a wire is too short, you can simply work from another socket (all pin 1’s are connected together, all pin 2’s, etc…). There should be no reason to need longer wires if you use some ingenuity.
- Reattach the long screws that hold the 11-pin plug to the panel.
- Check for shorts, and check each socket, all combinations. You should get (only) continuity between all pin 1’s, all pin 2’s, all pin 3’s, etc. If you find cross-continuity between any other pins, you accidentally created a short.
- Now is a good time to clean the entire panel and all other sockets. Deoxit applied to all other socket pins, and each pin individually cleaned.
- Plug panel into tester, reattach the two big phillips screws.
When you eventually wear out this new socket saver, it is easy to install another one. Remove the panel, remove the 11-pin plug screws, remove the 9-pin miniature socket screws. Pull out socket saver, plug in new one. Reinstall all screws. Time: approx 5 minutes!


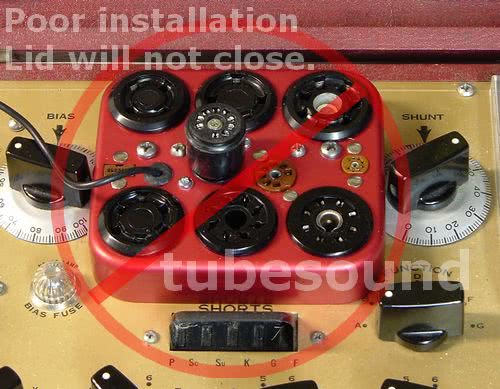
You can compare my method above with the traditional (poor) method of simply plugging a socket saver into the panel, which prohibits the case lid from closing, and generally looks ugly.

regards,
Bob Putnak.
eBay ID = rjputnak
© 2008. All rights reserved.
