I find it exciting to discover a nice audiophile amp from a nondescript brand. In this article, I chronicle my rebuilding of a PACO preamp-amplifier model SA-50.
PACO is the Precision Apparatus Company, best known for building quality test equipment such as tube testers, signal generators, and oscilloscopes. The “PACO” branded gear (as opposed to gear that used the full name of “Precision Apparatus”) was sold as a build-it-yourself kit. During this rebuild and subsequent troubleshooting, I found two connections that were never soldered, and one loose solder joint. Those issues are extremely common to find when servicing vintage kit-built gear.
I do not have any paperwork or background information about this model. I did find a schematic for a model SA-40, which appears to be largely the same circuitry.
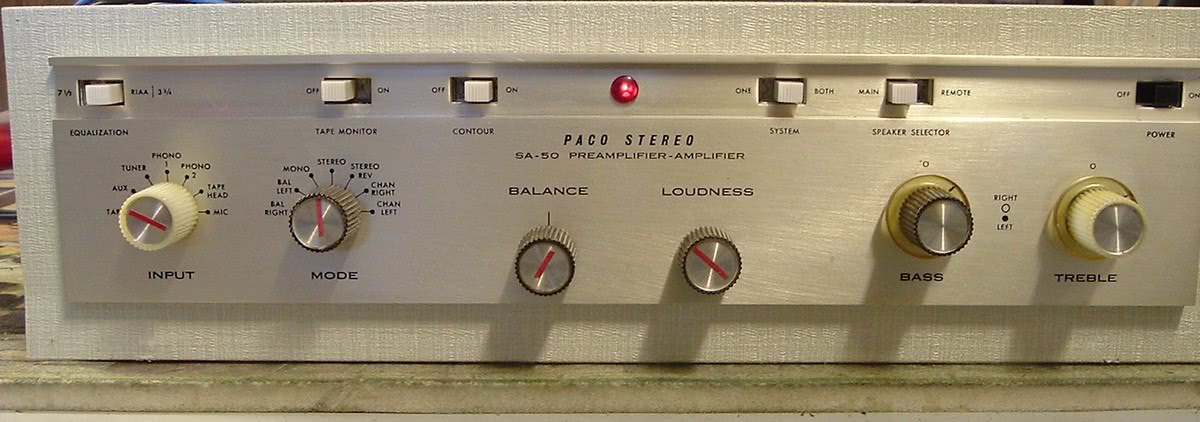
The SA-50 is a stereo preamp-amp with these design provisions:
- 7 inputs (two different phono inputs, tape, tape head, mic, tuner, aux)
- bass & treble controls can be separately manipulated for each channel
- “contour” control provides a kick-in-the-bass for fans of exaggerated bottom
- selectable phono equalization 7½ RIAA 3¾
- a switch can flip the amp into mono operation for times that you may be inputting a single-channel device (such as a Hi-Fi mono FM tuner)
- output taps for 16-8-4-2-1 ohm speakers
- solid-state power supply, B+ supplied via a voltage-doubler circuit (somewhat rare among audiophile amps), bias supply provided by a separate transformer winding, half-wave rectified and filtered
- each channel has a “bias” pot for the output tubes, but the pot is not really a bias control but more accurately a balance control to match the push-pull 7189 output tubes
- preamp tubes are three 12AX7 with shields
- driver tubes are two 7199 with shields, one tube per channel
- output tubes are a quad of 7189, two per channel
- tube heaters powered from 6.3 vac winding (not DC), with hum pot to minimize hum
- line fuse: 3 amp
First Impressions “as found”:
The amp is certainly nondescript in appearance. Very conventional design of the front panel and controls. The transformers look beefy, adding a decent amount of weight to the unit, and inspired confidence that the amp was capable of some sweet music.
The unit is original, having most of its originally-supplied PACO branded tubes (the 7199 tubes had been replaced). The PACO 7189 output tubes were made in England, so they may be Mullard manufacture. All three 12AX7 preamp tubes tested extremely weak, so I replaced them with RCA long-black-plates original 12AX7. The 7189 output tubes all tested excellent. Regarding the 7199 tubes, I planned to convert the circuit to use 6GH8A / 6U8 due to price and supply-chain considerations, and the fact that I prefer those tubes anyway.
The original capacitors were absolute garbage, some of the worst quality that I have seen. All would need to be replaced. All filters would need to be replaced. On a positive note, the resistors appear to be carbon film (not the crappy carbon-comp that you frequently find), and a quick test of many of them showed that they were spot-on tolerance, so I do not expect many (if any) will need to be replaced. The bias circuitry is too simplistic to allow the amp to achieve its potential and will need to be redesigned.
My Rebuild:
First, I checked all three transformers to make sure that the project was worth tackling. All tested fine.
Second, the power switch (slider-style) was broken, so it was replaced with new. The line cord was replaced with a new polarized cord, and I rewired the cord for proper safety design (fuse first, then switching the AC Hot lead). I installed a 2-amp inrush current limiter to allow a nice soft-start for the tube filaments and prevent the B+ caps from being slammed by the solid-state power supply. A 2-amp inrush current limiter was more than sufficient tolerance, as final testing proved the amp, even under full load, never surpassed 1.25A power consumption. It would be an issue if someone wanted to connect an external device, such as a tuner or turntable, to the rear switched AC socket, though. Since I never use an amp’s rear AC sockets, this is of no concern to me.
Third, the entire amp was recapped using new Sprague Orange Drops, which are my preference for most of my audiophile rebuilds. I feel that they are a great value. Invariably I find that I am impressed with the “sound” of Orange Drops — a bright, vibrant, pristine sound that I really prefer.
Fourth, I installed all new filter caps. I chose to install axial/radial units underneath the chassis.
Fifth, I replaced all vintage diodes with fresh Fairchild UF4007 (two in series for safety and performance) in the B+ supply.
Sixth, I replaced the old selenium rectifier in the bias circuit with a Fairchild UF4007. Next, I redesigned the bias supply to incorporate a variable biasing system that will allow a superior ability to bias the output tubes for maximum output and minimum distortion. Fortunately, the chassis has an open slot between the output trannys that permitted convenient mounting of my bias circuit upgrade.
Seventh, I tore open most of the slider-style switches and polished the contacts. I cleaned all rotary switches and pots with DeoxIt.
Eighth, I installed a 10-ohm resistor (¼w) in the cathode circuit of each 7189 output, which may someday protect the output transformers from a shorted 7189 tube.
Ninth, I converted the 7199 driver circuit to use 6GH8A or 6U8A. This mod required rewiring three pins on each socket.
Tenth, I polished and tightened all RCA input jacks.
Troubleshooting and Testing:
Now it was time to fire up the amp.
I immediately noticed that the operating voltages were significantly high across the board. At a typical modern mains voltage of 122vac to 124vac, the 7189 plate voltage was 465v. That is just one example. Everything was high, even with the inrush limiter installed (which drops the mains voltage by a few volts). This problem required a total change in the B+ voltage divider; the resistance had to be changed at every drop to bring the B+ voltages into line according to the schematic.
Once the operating voltages were spot-on, I proceeded to bias the amp. I do not bias audiophile amps to a “number” — not for voltage nor a particular plate current. I will sometimes make an exception with very expensive output tubes, such as NOS 7591’s, where I will often try to strike a balance between running the tube a little cooler, but the tradeoff is always increased distortion. Since most audiophiles abhor distortion, I try to avoid this compromise. Because 7189 russian equivalents are affordable and available, I made no compromise and biased for least distortion.
I monitor each channel with my Sencore Waveform Analyzer oscilloscope and my automatic Total Distortion Meter (“TDM”). I drive the amp to its maximum output with my low distortion signal generator. First, I set the bias reasonably negative and reduce the bias voltage until the crossover notch disappears in the waveform. Second, for this amp, I adjust the miss-labelled “bias” pot for minimum distortion on the automatic TDM. Third, I re-bias for lowest distortion as read on my automatic TDM. Fourth, I again tweak the miss-labelled “bias” pot for minimum distortion. I will recheck the bias after several hours, and again after several days, to ensure maximum output and minimum distortion. (For numbers guys, idle cathode current on the 7189’s measured 17 ma to 18 ma).
The results were outstanding. At the outset of rebuilding (but before optimal biasing), Total Distortion measured approx 2.5% per channel. After my bias circuit upgrades and optimal biasing, Total Distortion measured 0.3% to 0.4% at full output @ 1kHz. These are pretty good distortion specs for a tube amp, certainly well within “audiophile” parameters.
Square wave testing showed the amp can reproduce a nice looking square wave.
Several Days later and approx 10 hours of break-in:
The amp remained rock-solid in every facet except that I heard a slight distortion. Square wave testing showed ringing on the positive flat in one channel, which was quickly tracked down to a singing 47pf ceramic disc capacitor in the driver circuit. Since this cap was bad, I thought it would be smart to replace the ceramic disc in each channel with a new silver mica cap.
Listening Test:
I will start by noting my preference for a pure sound. I seldom prefer exaggerated bass. As such, I do not enable any bass boasting technology unless the recording demands it. Hence, unless noted, the Contour setting is disabled.
The amp has impressed friends and family alike. In listening to Sarah Brightman’s “Eden”, my girlfriend described the experience as “feels like I am hearing Sarah performing live at the Pittsburgh Benedum Center in the upstairs seating area” (which is known to have good acoustics). My neighbor, who has no experience with tube amps, and who loves his 700-watt Phase Linear gear, was almost speechless at what incredible sound this little amp was capable of — all while driving into a cheap $30 set of Dayton Audio B652 bookshelf speakers.
Sound is obviously subjective to the listener, so I can only offer my opinion. In its pure setting without Contour (bass boast) enabled, it has a tight bass that is not overstated or saggy, a fluid midrange, and highs that are vibrant and refreshing. The ting of a cymbal, high hat, or triangle… all sing with clarity and vibrance. I can listen for hours at higher volumes without ear fatigue.
As a listening test, I have played a large variety of music that I enjoy. Sarah Brightman’s “One Night in Eden” DVD was lively and impressive, like a little brother “wanna-be” to my McIntosh MC60’s. “Dust in the Wind” from her “Eden” CD was truly an acoustic guitar auditory orgasm. Along these same lines, I sampled my favorite tracks from Sarah McLachlan’s “Mirrorball” CD. Her vocals on “Fear” actually caused goosebumps.
Switching to 80’s heavy metal, I assaulted the PACO with Dokken’s “Back for the Attack”. No surprises. The PACO accosted me with an attack of George Lynch’s melodious metal riffs on “In My Dreams” and “It’s Not Love”, with each note during his guitar solo’s being easy to pluck out. I then switched to Kiss’s “Asylum” album, as I have found that a substandard amp or speaker system will make it harder to pick out Gene Simmons’s bass guitar line during the main verses in “Uh All Night.” As expected, his bass run was easy to distinguish even without Contour enabled.
My next journey brought me to 1930s and 1940s big band recordings, remastered CD’s of Glenn Miller and Tommy Dorsey. This amp really excels at reproducing big band. Tex Beneke would be proud.
My last stop in the musical journey was a little Hip-Hop / Rap / Rock. Tone Loc’s “Funky Cold Medina” was better with Contour enabled, as was Linkin Park’s “Waiting for the End.” It seems as though those recordings want an exaggerated low end, so enabling Contour made that low end pop.
“the Specs”
Back-of-the-envelope specs as measured on my equipment (Sencore Waveform Analyzer, Automatic Total Distortion Meter, Heathkit Audio Analyzer):
- Maximum power output, tested at 1kHz, is approx 10.5 watts per channel with 0.3% to 0.4% total distortion at full output into an 8-ohm resistor load. This output is achieved from the original, used, Made in England PACO-branded 7189 output tubes and with used RCA black plate 12AX7 preamp tubes. The 6GH8A driver tubes are new. I could eek out another 1+ watt by permitting the distortion to reach 1%.
- power consumption: approx 1.0 to 1.1 amp full output
- good square wave reproduction
- Frequency response ± 3db from 22Hz to 24kHz at full output
Thus, on paper, the specs are rather pedestrian. Of course, most audiophiles are quick to point out that your ears are the only test that matter.
Conclusion
It’s a surprisingly nice amp. In a world full of $1000+ power monoblocks and $2000+ SET headphone amps, this PACO has to be real bargain. If you plan to tackle a rebuild yourself, expect to invest a lot of time on this project.